
Polycom phones are renowned for their reliability and advanced features, offering high-quality voice and video communication solutions. Popular models include the VVX 601 and SoundStation IP 5000. These devices are essential for seamless communication in office and remote environments, designed to enhance productivity and user experience.
1.1 Overview of Polycom Phone Models
Polycom offers a diverse range of phone models designed for various communication needs. Popular models include the VVX 601, VVX 250/350/450, and SoundStation IP 5000. These phones are known for their sleek designs, HD voice quality, and intuitive interfaces. Desktop models feature touchscreens and advanced call management, while conference phones excel in group settings with 360-degree audio. Each model is tailored to meet specific business requirements, ensuring seamless integration with VoIP systems and enhancing user productivity.
1.2 Key Features of Polycom Phones
Polycom phones are equipped with advanced features like HD voice and video, ensuring crystal-clear communication. They offer intuitive touchscreens, seamless call management, and integration with platforms like Skype for Business. Additional features include multi-line support, call forwarding, and voicemail. Enhanced security protocols and customizable settings further enhance user experience, making them ideal for both personal and professional use.

Setting Up Your Polycom Phone
Setting up your Polycom phone involves connecting to power, linking to your network, and configuring settings. Auto-provisioning simplifies the process, ensuring a seamless setup experience.
2.1 Initial Setup and Configuration
Start by powering on your Polycom phone and connecting it to your network. Select your preferred language and configure basic settings like time and date. For manual setup, enter your SIP credentials, while auto-configuration streamlines the process by downloading settings automatically. Ensure the phone is connected to power and the network. The display will guide you through initial setup, confirming connectivity and configuration status. Proper setup ensures optimal functionality and performance.
2.2 Connecting to the Internet and Network
Connect your Polycom phone to the internet using an Ethernet cable or Wi-Fi. Plug the Ethernet cable into the phone’s port. Ensure DHCP is enabled for automatic IP assignment. If manual setup is required, enter the IP address, subnet mask, and gateway. For Wi-Fi, select your network and enter the password. The phone will indicate successful connection via LED lights. Access network settings through the menu for further adjustments.
2.3 Auto-Configuration vs. Manual Configuration
Polycom phones support both auto-configuration and manual setup. Auto-configuration automatically downloads settings when connected to the internet, simplifying the process. Manual configuration requires entering IP addresses, subnet masks, and gateways, offering more control for advanced users. Auto-configuration is ideal for quick deployment, while manual setup suits custom network environments. Refer to the user manual for detailed instructions on both methods to ensure proper configuration based on your network requirements.

Basic Phone Operations
Master essential functions like placing calls, using the speakerphone, and navigating the interface. Access features like hold, mute, and call transfer for efficient communication management.
3.1 Placing and Answering Calls
To place a call on your Polycom phone, select the dialer, enter the phone number using the keypad, and press the call button. You can use the handset, speakerphone, or headset for calls. To answer an incoming call, lift the handset or press the speakerphone key. Use the “End” button or replace the handset to terminate the call. Ensure your phone is properly configured for seamless call management.
3.2 Using Call Hold, Mute, and Transfer
To place a call on hold, press the “Hold” button or use the soft key during an active call. The caller will hear hold music until you resume. To mute, press the “Mute” button, which disables your microphone. For transferring, press “Transfer,” dial the recipient’s number, and press “Transfer” again to complete. These features enhance call management, allowing seamless communication and minimizing interruptions during conversations.
3.3 Navigating the Phone Interface
Navigate the Polycom phone interface using the intuitive menu system. The home screen displays essential features like call history and contacts. Use soft keys for context-sensitive actions and the navigation pad to scroll through menus. Access settings, directories, and call logs via the main menu. Customize your experience by adjusting display settings and organizing frequently used features for easy access, ensuring efficient operation of your Polycom phone.
Advanced Features and Functionality
Polycom phones offer advanced features like multi-line support, voicemail integration, call forwarding, and Do Not Disturb. These functionalities enhance productivity and provide a seamless communication experience for users.
4.1 Multi-Line Support and Call Management
Polycom phones support multiple lines, allowing users to manage several calls simultaneously. This feature is ideal for busy environments, enabling efficient call handling. The system provides clear visual indicators for active calls, hold statuses, and incoming lines. Users can easily switch between calls, ensuring seamless communication. The multi-line functionality enhances productivity, making it simple to juggle multiple conversations without missing important calls or messages. The interface is intuitive, ensuring a smooth experience.
4.2 Using Voicemail and Message Services
Polycom phones offer comprehensive voicemail and message services, allowing users to manage missed calls and messages efficiently. Access voicemail directly through the phone menu, using your password or PIN for security. Features include message playback, deletion, and forwarding, as well as options for recording personalized greetings. Additionally, users can utilize visual voicemail through the web-based portal, enabling easy message management and retrieval from any device. This enhances convenience and ensures important messages are never missed.
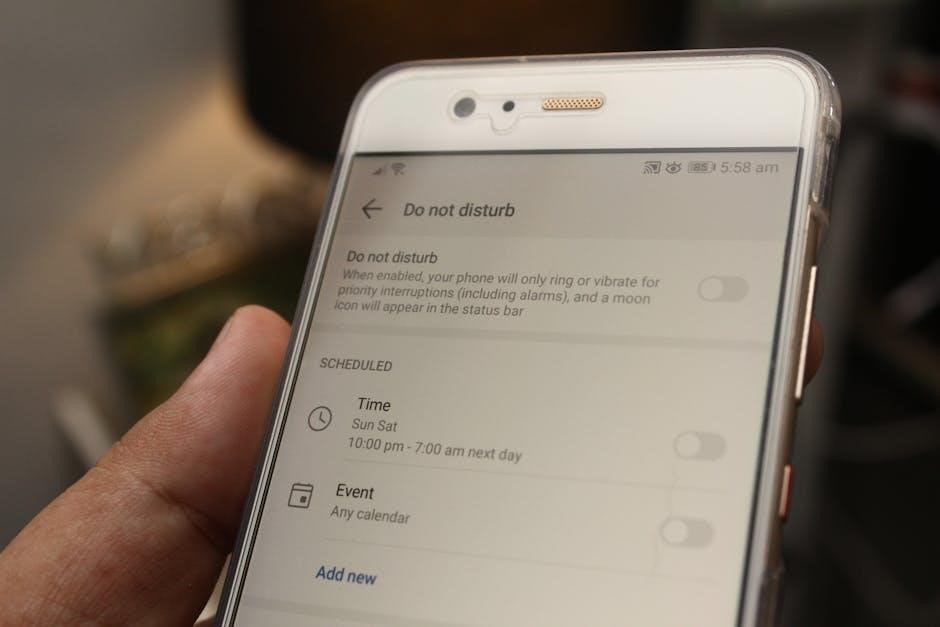
4.3 Call Forwarding and Do Not Disturb
Call Forwarding allows users to redirect incoming calls to another number or voicemail, ensuring calls are never missed. Do Not Disturb mode silences the phone during specified times, minimizing interruptions. Both features can be easily activated through the phone’s menu or the web-based configuration portal. These tools enhance flexibility and control over call management, catering to different work styles and preferences. They are essential for maintaining productivity and focus in dynamic work environments.

Customization and Personalization
Polycom phones allow customization of ring tones, display settings, and speed dial. Users can tailor their experience by adjusting these features to meet individual preferences and work styles.
5.1 Customizing Ring Tones and Alerts
Polycom phones enable users to customize ring tones and alerts to suit their preferences. You can select from a variety of pre-installed tones or upload custom ringtones. Alerts for voicemail, missed calls, and incoming messages can also be personalized. Settings for ring tone volume and alert notifications are easily accessible through the phone’s menu, ensuring a tailored experience for each user.
5.2 Adjusting Display Settings
Polycom phones allow users to customize their display settings for optimal viewing. Adjust brightness, contrast, and backlight settings through the phone’s menu. Access the display options under the “Settings” menu to tailor the screen to your preference. These adjustments enhance visibility and comfort, ensuring a personalized experience for each user.
5.3 Setting Up Speed Dial and Contacts
Efficiently manage your contacts and speed dial settings on your Polycom phone. Navigate to the “Contacts” menu to add, edit, or delete entries. Assign speed dial numbers to frequently called contacts for quick access. Use the phone’s interface to organize your directory, ensuring seamless communication. This feature streamlines your calling experience, saving time and enhancing productivity.

Troubleshooting Common Issues
Polycom phones may encounter connectivity or audio issues. Check network settings, restart the device, or reset to factory settings if problems persist for optimal performance.
6.1 Resolving Connectivity Problems
Connectivity issues with Polycom phones can often be resolved by checking network settings and ensuring proper Ethernet connections. Restarting the phone or router may also resolve the problem. Verify internet access and consult the user manual for detailed troubleshooting steps. If issues persist, contact customer support for further assistance.
6.2 Addressing Audio and Sound Issues
To resolve audio issues, ensure the volume is adjusted properly and the mute button is not active. Check headset connections and restart the phone if necessary. Verify speakerphone functionality and ensure no obstructions block the speakers. If problems persist, consult the user manual for troubleshooting guides or contact customer support for assistance.
6.3 Resetting the Phone to Factory Settings
To reset your Polycom phone to factory settings, navigate to the phone’s menu, select “Settings,” then “Advanced,” and enter the admin password. Choose “Factory Reset” and confirm. This will erase all configurations, restoring the phone to its original state. Ensure you back up important settings before proceeding. Consult the user manual or contact support for detailed instructions and assistance.

Accessing Online Portals and Resources
Access the web-based configuration portal by visiting https://phone.epbFi.com. Log in with your phone number and voicemail PIN to manage settings and view messages.
7.1 Using the Web-Based Configuration Portal
The web-based configuration portal allows users to manage their Polycom phone settings effortlessly. Visit https://phone.epbFi.com, log in with your phone number and voicemail PIN. The dashboard displays new messages, recent calls, contacts, and settings. This tool enables firmware updates, customization of preferences, and access to troubleshooting guides, ensuring seamless management and optimal phone functionality.
7.2 Updating Firmware and Software
Regular firmware and software updates are essential for optimal performance. Polycom phones support auto-configuration, downloading settings upon connection. For manual updates, log in to the web portal using your phone number and voicemail PIN. Navigate to the firmware section, select the latest version, and confirm the update. This ensures access to new features, security patches, and improved functionality, keeping your device up-to-date and secure.

Documentation and Support
Polycom provides comprehensive user manuals and guides for all models. Visit the web portal or contact customer support for assistance and resources.
8.1 Accessing User Manuals and Guides
Polycom provides detailed user manuals for all phone models, available on their official support page. Users can download PDF guides for models like VVX 250, SoundStation IP 5000, and more. These manuals cover setup, features, and troubleshooting. Visit the web-based configuration portal or contact support for direct links to your specific device’s documentation.
8.2 Contacting Customer Support
Polycom offers comprehensive customer support through various channels. For assistance, users can contact support via email at CustomerSupport@nextera.net or call 877-639-8372. Additionally, online forums and community resources provide troubleshooting tips and answers to common questions. For specific issues, such as device reuse or compatibility, contacting your administrator or referring to the official support portal is recommended for tailored solutions.
Polycom phones offer a seamless communication experience with advanced features and intuitive design. By mastering their functionality, users can enhance productivity and efficiency. For further assistance, visit the official Polycom support portal or contact customer support at 877-639-8372 or CustomerSupport@nextera.net. Explore more resources and updates at https://phone.epbFi.com to stay connected and make the most of your Polycom phone experience.